
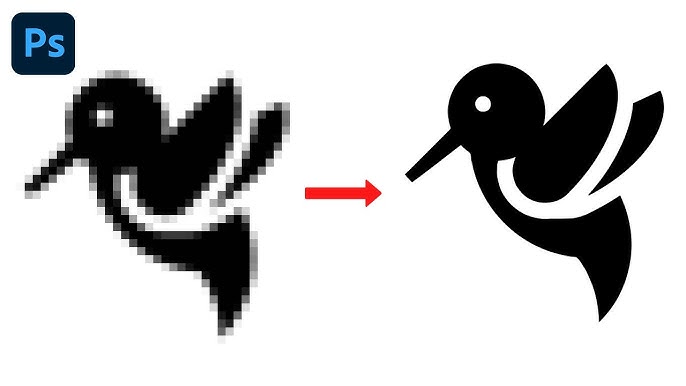
Every designer has encountered the same frustrating situation: a client hands over their logo as a tiny JPEG, a blurry PNG, or sometimes just a screenshot from their website. The original vector file is long gone. The designer needs a clean, scalable version for a billboard, a website header, or an embroidered uniform patch. Redrawing it from scratch is time-consuming. But there is a better path: automated vectorization paired with smart cleanup.
This guide walks through the entire process of taking a low-resolution logo and converting it into a clean, professional SVG vector without manual tracing.
Understanding Why Low-Res Logos Happen
Logos get degraded for predictable reasons. A business launched ten years ago, worked with a designer who kept the original files on a personal hard drive, and eventually that designer moved on. What remains in the company’s possession is a few low-resolution JPEG exports used for email signatures and Facebook profile pictures.
This is not a niche problem. It is one of the most common real-world design challenges, and the solution has improved dramatically as AI-based vectorization tools have matured.
Step 1: Assess What You Are Working With
Before converting anything, evaluate the source image. Open it in a standard image viewer and look for these characteristics:
The quality of your conversion output depends heavily on what you start with. A logo with clean, distinct colors and clear edges will vectorize much better than a logo that has JPEG compression artifacts (those blocky patterns you see around edges in over-compressed images), gradient shadows, or photographic elements blended into it.
If the image has heavy JPEG artifacts, consider running it through an AI image upscaler first. These tools (separate from vectorization tools) use neural networks to reconstruct lost detail. Even a modest improvement in edge clarity significantly improves vectorization results.
Step 2: Choose the Right Conversion Method
There are two main approaches to converting a raster logo to SVG: pixel tracing and AI-powered generation.
- Pixel tracing analyzes the color regions in your image and converts their boundaries into vector paths. This is the traditional approach, implemented in tools like Illustrator’s Image Trace and standalone vectorization services. It works well for logos with flat colors and high contrast, but struggles with logos that have gradients, drop shadows, or anti-aliased edges.
- AI-powered conversion uses machine learning to interpret the image and generate clean vector paths that represent the intended design rather than just the pixel data. This produces significantly cleaner results for degraded source images because it can infer where edges should be even when the pixel data is ambiguous.
Using an SVG converter that leverages AI gives you the best chance of a clean first pass, especially when the source image is genuinely low quality.
Step 3: Prepare the Image Before Converting
A few minutes of preparation pays dividends in conversion quality.
- Remove the background first. A white or transparent background is ideal. If the logo has a colored background, crop or remove it before vectorizing. Background colors create extra regions that the converter must process, and they can interfere with accurate edge detection at the logo’s boundary.
- Increase contrast if possible. Open the image in any basic photo editor and push the contrast up slightly. This makes edges sharper and gives the vectorization algorithm more to work with.
- Scale it up if the image is very small. While upscaling a raster image does not add genuine detail, AI upscaling tools create plausible detail that helps vectorizers produce cleaner paths. A 200×200 pixel logo upscaled to 800×800 will generally vectorize better than the original tiny version.
Step 4: Run the Conversion
Upload your prepared image to your chosen vectorization tool and run the conversion. Most tools offer settings that control the level of detail captured, the color threshold, and the smoothing applied to paths.
For logos, you typically want:
- Moderate smoothing (aggressive smoothing loses fine details; no smoothing produces jagged paths)
- Color count matching your actual logo colors (if the logo has three colors, tell the tool to output three colors)
- High detail level for logos with fine lines or thin letterforms
Run the conversion and inspect the result. Zoom in to 200-400% in the preview to check edge quality. Look specifically at corners (do they come to clean points or are they rounded incorrectly?), thin lines (are they solid or broken?), and letterforms (are curves smooth?).
Step 5: Clean Up the Output
Even the best automated conversion rarely produces a file that needs zero cleanup. Common issues to address:
- Stray anchor points: Complex logos sometimes produce paths with unnecessary anchor points that create subtle bumps in curves. Select each path and use the path simplification tool to reduce the node count without changing the visible shape.
- Incorrect colors: AI conversion sometimes shifts colors slightly. Compare the converted SVG against your source image and correct any color values that look off. This is a simple attribute edit in the SVG code.
- Merged elements: If two adjacent logo elements were converted as a single merged path, you may need to manually separate them. This is easier when the elements are different colors.
- Missing details: Very fine details like thin lines or small text may not convert cleanly from a low-res source. Evaluate whether these elements need to be recreated manually or whether a slightly simplified version of the logo is acceptable for the intended use.
Step 6: Verify Scalability
The whole point of converting to SVG is infinite scalability. Test this explicitly: open the finished SVG in a browser and zoom to 400%, 800%, and 1600%. Everything should remain crisp and sharp. If you see pixelation, the file may have accidentally embedded raster elements during the conversion process, check the SVG code for any <image> tags and replace those sections with proper vector elements.
Step 7: Optimize the File
Production-ready SVG files should be optimized to remove unnecessary code. Conversion tools often output verbose SVG with redundant attributes, empty groups, and unused definitions. Running the file through an SVG optimizer reduces file size and makes the code cleaner, which matters for web performance.
When Vectorization Is Not Enough
Some logos simply cannot be recovered through automated conversion, no matter how good the tool. Logos with photographic elements, complex gradients, or source images so degraded that the original design is genuinely ambiguous require manual recreation.
In these cases, use the automated conversion output as a rough starting point and redraw the clean version on top of it. This is faster than starting from scratch because you can use the automated paths as positional guides even if you replace them entirely.
Conclusion
Converting a low-resolution logo to a clean SVG vector is a solvable problem in most cases. The key is combining intelligent source preparation with a high-quality AI-powered conversion tool, then spending a focused cleanup session addressing whatever the automation got wrong. SVGMaker provides both the conversion and cleanup capabilities in one place, which streamlines the workflow considerably. What used to take hours of manual tracing can now be accomplished in minutes.